You can change the domain name for your WordPress site any time you like, but there are a few important settings that must be made in order to make the switch.
Make sure to carefully follow the steps below to ensure it's done properly.
Several reasons to change the URL
The following are instructions for moving a WordPress installation from one URL to a different one. There are different cases for moving a WordPress install, as shown below.
Case #1 — Moving to a different directory
The first case is when a WordPress site moves its location into a different directory.
This could be from the primary domain to a subdirectory
- example.com to example.com/blog
or from the subdirectory to the primary domain
- example.com/blog to example.com
If you've already moved your domain to a new URL, you are not able to log in since WordPress is configured to use the old URL.
Case #2 — Adding or removing www
Another reason to update your URLs is if you wish to add or remove www from your domain.
After adjusting the URL, you may also see a browser redirect error when viewing your site. It may say "Too many redirects" or "The page isn't redirecting properly".
Case #3 — Adding 'https' to the URL
If you're using an SSL certificate, the first part of the URL changes from http to https. If you've already made this change, you are not able to log in since WordPress is configured to use the old URL.
Case #4 — Moving to a new domain
The last case is when a WordPress site moves from one fully hosted domain to a different one. For example:
- Move from https://example.com
to - https://dreamhost.com
If this option applies to your site, view the following article for full instructions on moving a WordPress install to a different domain
The following two options explain how to update all URLs in your database to the new URL.
Option 1 — Using the command line
This example updates the URL from example.com to example.com/blog.
The following section is also available as an instructional video:
If you are familiar with the command line, you can run the following command to update all URLs in the database at once.
- First, log into your server via SSH.
- Next, navigate to your WordPress directory. Make sure to change username to your Shell user.
[server]$ cd /home/username/example.com
- In your site's directory, you can use wp-cli to update the URLs using the following command.
[server]$ wp search-replace http://example.com https://example.com/blog --dry-run
The --dry-run call at the end tests the address
If the changes make sense to you, then run the above command again without the dry-run call.
Option 2 – Using phpMyAdmin and a plugin
This example updates the URL from example.com to example.com/blog.
You can also use phpMyAdmin to update the home and siteurl fields directly in your database.
Visit the following article for more information on how to log into phpMyAdmin:

Step 1 — Changing the home and siteurl fields in phpMyAdmin
The following section is also available as an instructional video:
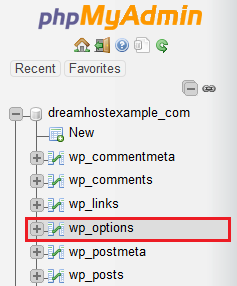
- Open phpMyAdmin.
- Click your database in the left pane. Several tables appear below it. Click on your wp_options table.
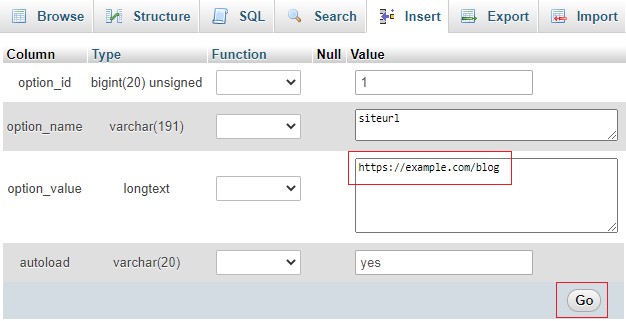
- Locate the siteurl and home rows. Click the pencil icon next to each to edit.
- When you scroll over these options, "browse" will appear.

- Click the pencil icon next to each to edit.
- Alter the URL by typing in a new one.
- Click the Go button to save the settings. Do this for both the siteurl and home options.
You should now be able to log into your site at example.com/wp-login.php.

Step 2 — Update the remaining URLs
The following section is also available as an instructional video:
Although this gives you access to your site, any other URLs in your database are still using the old URL. You can use a plugin to update the remaining URLs in your database:
When changing URLs in WordPress, you must make sure the DreamHost panel does not conflict with your new URL settings by adding or removing www from the domain name. View the following article for information on how to ensure the panel is correctly configured.
The examples in this step add HTTPS to the URL and change the domain name to a subdirectory.
Below are a couple of plugins that work to change all URLs in your database.
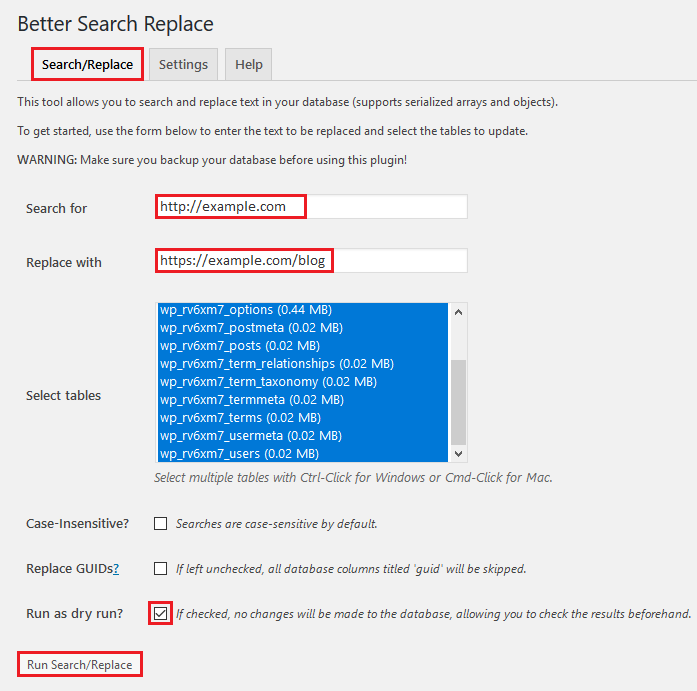
The following steps walk you through how to update your URLs using the 'Better Search Replace' plugin. This example changes the URLs in the database from http://example.com to https://example.com/blog.
- First, make a backup of your database. Just in case something goes wrong, you can easily replace your old database data.
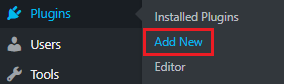
- Download the Better Search Replace plugin. In your panel navigate to Plugins > Add New.
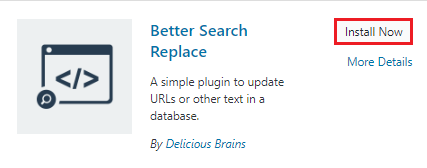
- Search for 'Better Search Replace'.
- Click Install Now.
- Click Activate.
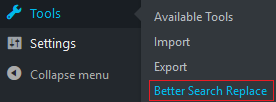
- In your Dashboard, navigate to the plugin under Tools > Better Search Replace.
- Click the Search/Replace tab.
- In the first field titled Search for:, enter your current http URL. For example:
- http://example.com
- In the second field titled Replace with:, enter your new URL. For example:
- https://example.com/blog
- Select all tables.
- You probably want to leave Replace GUIDs UN-checked. View the following article for further details:
- Check the box titled Run as dry run?.
- Click Run Search/Replace.
- This should respond with a message at the top notifying you of what would have been updated if you did not check the Dry Run box.
- If everything looks good, run it again with the Run as dry run? box UN-checked.
- A confirmation will display notifying you of how many changes were made.
At this point, all URLs in your database point to your site's new URL.
Final cleanup
Clearing your cache
At this point, you should also delete your cache if using WP Super Cache.
HTTPS
If you check your site now, all URLs within your WordPress site will use the new domain name and point to HTTPS. However, there are a few other steps you must take to fully ensure all links within your site point to the secure version of your domain name (This means the HTTPS version).
View the following article for additional steps you should take to adjust your WordPress site to use an SSL certificate.
